Add or Edit Redactions on the Image Tab
Redactions obscure the content of image files so that only
appropriate information is visible in the files you prepare for discovery.
In Review, up to 99 redaction categories—with different colors and
labels for each—may be used.
Redactions can be viewed in Review as solid,
outlined, or cross-hatched (if user has appropriate privileges.) The following
figure shows a solid redaction in an email image file.
If several pages or documents have the content in the same
location on each page that needs to be redacted in the same way, you can
apply a redaction to all pages at once.
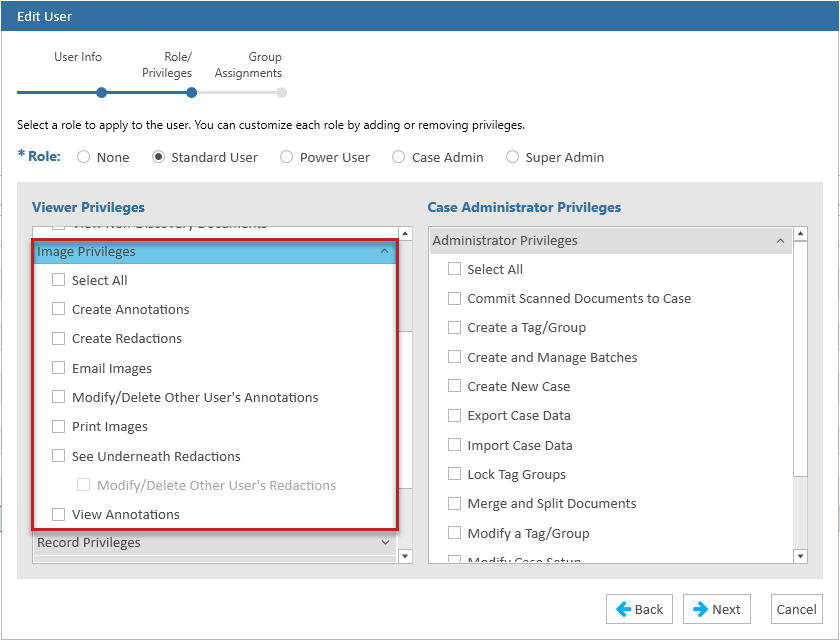
Redaction Privileges
Permission to use the Redaction tools is restricted based off of privileges. If a user does not have the Create Redactions privilege they cannot create a redaction, draw a redaction, or select a redaction category. Users who have the privilege to View Annotations will be able to change the view of the redaction (e.g. solid, hatch, or outline).
Reviewers who have the See Underneath Redactions privilege must also be assigned the Modify/Delete Other User's Redactions privilege in order to change or remove the redactions added by other users.
Reviewers who do not have the See Underneath Redactions privilege, called “restricted users” in this discussion, will have limited
access to content in Review after redactions are added.
On the Image
tab:
When a user other
than the restricted user adds a redaction, the restricted user will
not see under redactions on the Image
tab.
When a restricted user is
the only person who has redacted
content on a page, the user will be able to see the content they have
redacted on that page.
-
Content on the Quick
View and Extracted Text
tabs will be restricted similarly.
-
The restricted user will not
be able to open the document's native file, if one exists.
-
The restricted user will not
be able to copy OCR text from an EXTRACTEDTEXT field in the Case View or other tab in the documents
pane.
Click the links below to view step-by-step procedures for adding or editing redactions.
If you have the privileges to do so, redact information
in an image as follows:
-
In
the Image tab, locate the information to
be redacted.
-
By
default, redactions are solid. If a cross-hatch or outline redaction
style is needed, click the down arrow next to the Redaction button,
, and select the needed style. This style applies
to all redactions applied (on all pages) and it can be changed after
redactions have been applied.
-
On
the Image tab toolbar, click the Redaction
button.
-
Drag
across the text or image area that is to be redacted. The selected
area is highlighted with a dotted line, as shown in the following
figure.
-
When the selection is complete,
release the mouse button. Note that redaction labels resize to fit
the size of the redaction.
-
In the Select Redaction
Category dialog box, select the type of redaction to be applied from
the list. If you have any question about the categories, refer to
your case instructions or contact your administrator.
-
Click OK.
A solid redaction is added along with the category label selected.
-
Repeat these steps to apply
other redactions.
-
When finished, click the
Pointer, , or another button to stop
the redaction activity.
If you have sufficient privileges, you can change the size
of a redaction as follows:
-
For
a selected record, in the Image tab, locate
a redaction to be resized.
-
On
the Image tab toolbar, click the Move button
.
On the image, the mouse pointer changes to .
-
Place
the mouse pointer over the edge of the redaction that needs to be resized. The resize arrows will appear. Drag
until it is the correct size, then release the mouse button.
|
TIP:
Position the pointer at the edge of the redaction and drag up/down to decrease/increase
the redaction size vertically and to the left/right to decrease/increase
it horizontally.
|
-
Repeat step 3 to resize
other redactions, or click another button to perform another action.
-
When finished, click the
Pointer, , or another button
to stop the redaction activity.
If you have sufficient privileges, you can move a redaction
as follows:
-
For
a selected record, in the Image tab, locate
the redaction to be moved.
-
On
the Image tab toolbar, click the Move button,
.
On the image, the mouse pointer changes to .
-
Place
the mouse pointer over the redaction, drag it to the needed location,
then release the mouse button.
-
Repeat
step 3 to move other redactions, or click another button to perform
another action.
-
When
finished, click the Pointer, , or
another button to stop the redaction activity.
If you have sufficient privileges, you can change a redaction's
category (color/label) as follows:
-
For
a selected record, in the Image tab, locate
the redaction to be changed.
-
Double-click
the redaction.
-
In
the Select Redaction Category dialog box, select the type of redaction
to be applied from the list and click OK.
-
If
needed, repeat this procedure to change other redaction categories.
You can use a quick
search or change the Advanced Search Options to find redactions, including searching for all documents that
include redactions or have no redactions.
Use the following procedure to apply a redaction to content
in the same location in a range of pages (comprising one or more documents).
For example, a name that needs to be redacted may be repeated in the header
of all pages or a document, or several documents.
This procedure works accurately when the pages are the
same size and resolution.
-
Identify the starting and
ending image keys (BEGDOC values) of the documents/pages to which
the redaction should be applied.
-
In the Image
tab, apply the redaction
to one of the pages.
-
Right-click the redaction
and select Annotation Options >
Apply to Range.
-
Enter the Start
and EndImage
Key, or click ... and
select them, then click OK.
The redaction is applied to all pages in the range. Once the redaction
is applied, it is unique to each page. That is, if you move or otherwise
change one of the redactions in the range, the other redactions are
unaffected.
|
IMPORTANT! No warning message or Undo function
exists when deleting redactions. Ensure the intended redaction
is selected before you delete it.
|
If you have sufficient privileges, you can delete redactions
as follows:
-
For a selected record, in
the Image tab, locate the redaction to be
deleted.
-
Right-click the redaction
and select Annotation Options > Delete.
Related Topics
Overview: Image Tab